BE WARNED THAT THIS TUTORIAL WON'T TELL YOU THE LOCATIONS FOR ALL SPECIFIC THINGS SUCH AS SABER TEXTURES OR MAP TEXTURES, MAYBE IN ANOTHER TUTORIAL. ALSO, DON'T CONFUSE .SKIN FILES WITH SKINS, THEY ARE DIFFERENT.
Hello and welcome to my first tutorial of modding MBII, today i will cover how to find the assets location and make a texture edit/skin for an already existing character, objects and others.
Setup
To find your desired skin(s), you must first find the MBII's assets folder.
First open your file explorer ( The folder thing)
Then find your JKA folder by copy and pasting this path onto the path box the (For steam users) :
C:\Program Files (x86)\Steam\steamapps\common\Jedi Academy
Once you reach the folder, you'll find 3 other folders, click the one that says GameData. After you entered the GameData folder, you'll find 3 other folders saying : base (Files(Textures for example) for the normal JKA game), MBII (Files for MBII (Maps, textures, sounds and models) and MBII_Launcher (If you wish to edit the startup launcher's look). What you want to do is enter the folder that says MBII.
Now you're all setup and ready to find your skins!
Finding and extracting the desired Texture/Skin
To find a Texture/Skin of a character you'll have to enter one of the many .pk3 (MBII's files folders) folders in the MBII folder you entered long ago. It's recommended to use Winrar to open .pk3 folders (It's free). Let's say you want to edit a model, then you will have scroll down to the bottom of the folder and find a .zip folder called : zz_MBModels.pk3 or zz_MBModels2.pk3.
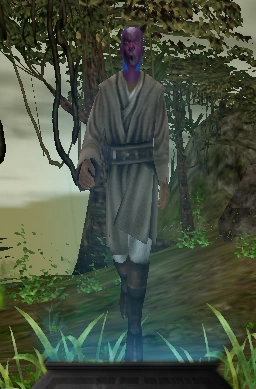
Let's edit Mace Windu's head, shall we? First enter the zz_MBModels.pk3 folder with Winrar, at first you will find a folder called models, just click it and you'll notice a sub-folder called players, also click it. After entering the players folder, you'll have to scroll through many character named folders that are in MBII, but to find Mace Windu, you'll have to scroll down to find a folder named : mace_winduvm.
Now, just enter the folder and you'll find many JPEG files/Textures for Mace Windu. The good thing is that each texture have the name of the limb that they are applied onto, like the head for example since the texture file for the head is named Head.tga (It can vary between TGA and JPEG files, but Mace Windu has a TGA file for his head texture). Select the Head.tga file and drag it to your desktop or a folder if you want.
Now with Mace Windu's head Texture extracted to your folder or desktop, it's time to edit them and import them to MBII!
Editing and Importing the Texture file.
(It's best to keep your zz_MBModels.pk3 folder open since you'll need it)
First, open the Head.tga that you extracted with a image editor (Photoshop is the best for this). This what will come up on your screen.
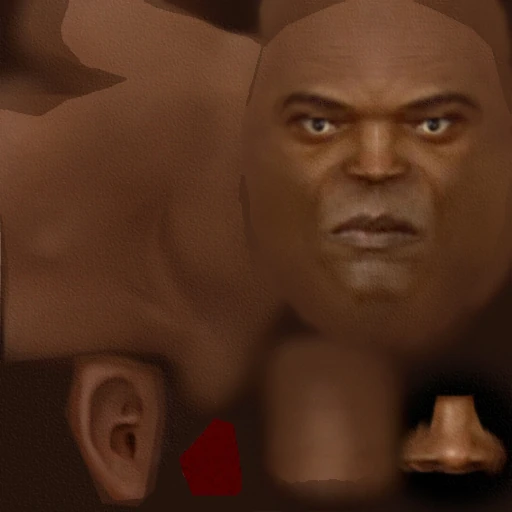
It's pretty easy to break the code and know each part of Mace Windu's head in this Texture file. But for now, let's edit his face and just do something random for testing purposes.

With that weird shit that i have done on our hands, we will proceed onto importing this into the game and playing around with it.
So first, what you'll have to do is Select the edited Texture file and drop into the mace_winduvm folder inside the ZZ_MBModels.pk3 folder you opened some time ago. It will ask you if you want to really import it and replace the non-edited original Head.TGA file in the mace_winduvm folder, just click yes if you're satisfied with the edited texture's result (It's recommended that when you replace the default texture with the edited one, make sure to backup the original one if you get tired of using the edited texture).
Now simply launch the game and you're ready to go.
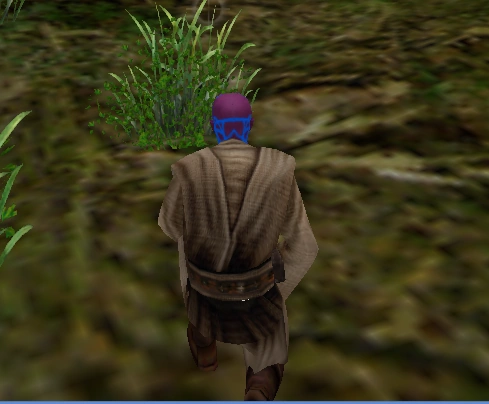
Result